

This tutorial is completely my own and any similarity is just pure coincidence...
Supplies Needed:
I use PSP X6
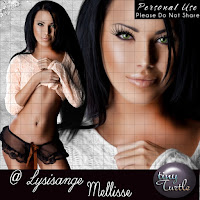
Tube of Choice, Im using in this one,Mellisse By Lysisange, which you can purchase HERE at Tiny Turtle Designs Store.
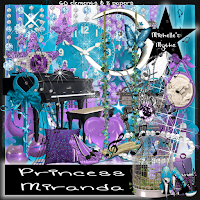
Scrap Kit: Princess Miranda by Michelle's Myths which you can purchase HERE
Font of Choice I used Sacramento, which I got as a free font, HERE
Ok Lets get Started...
Open Up a new image, 900 x 900 (this tends to work better when using more elements)
It will look big but you will resize later...
Now choose
Frame 6
and place it in your new image.
Supplies Needed:
I use PSP X6
Tube of Choice, Im using in this one,Mellisse By Lysisange, which you can purchase HERE at Tiny Turtle Designs Store.

Scrap Kit: Princess Miranda by Michelle's Myths which you can purchase HERE

Font of Choice I used Sacramento, which I got as a free font, HERE
Ok Lets get Started...
Open Up a new image, 900 x 900 (this tends to work better when using more elements)
It will look big but you will resize later...
Now choose
Frame 6
and place it in your new image.
Resize by 125%
Now place your tube in your image resize by 50% and arrange so tube is on right side and frame on left, see my tag for example. You want your tube over the frame but you also want to be able to see MOST of the 3 squares.
Next take your magic wand tool and click inside each square.
Expand by 10 and then invert
Choose your paper to fill frame next.
I chose paper 2, place in image and place on bottom layer. Make sure you are on your paper layer and click delete on your keyboard to remove excess paper. Then select none.
Next duplicate your tube 2 times, place the first one above paper layer, flip it horizontally and place it so that her head is in the top frame and her body is in the frame just below it. See my tag as example.
Take the next on and place it in the frame just behind your original tube. Arrange her so you can see her face above the original tube's shoulder.
Go back to your magic wand tool and repeat click inside each square.
Expand by 10 and then invert. Then click on each tube below the frame and click delete to remove the excess of the tubes. Select None.
Now click on each duplicate tube that you just cut and placed behind the frame. Go to effects and artistic effects, and down to half tone, use settings :
Cell Properties:
Halftone pattern:
Round Size 2
Color scheme RGB
Screen angles :108/162/90
Use as an overlay
blend mode screen - 75%
Use this on both duplicate tube layers.
Now take element 44 and place on bottom layer at the bottom left.
Duplicate and place on bottom right, arrange to your liking.
Take element 48 and place just below your original tube layer. and place on the left. This WILL cover some of what you just did, but that's ok that's just the background and yuo can still see part of it.
Take element 15 next and place on top layer and place across your tubes legs.
Take element 11 and resiz by 25% then place on right above the tubes legs and place it on the right edge.
See tag for example.
Place element 24 next, resize by 25% and place behind tube layer and have it peeking out behind her legs and the shoes.
Now take elements 56 & 57 and place them on the left side just above her legs.
Resize each element by 35%
Take Element 40 and resize by 25% and place on right side over leg.
What we are doing here is covering up where her legs cut off and making it appear as tho she is standing behind these items.
Take element 54 rotate it by 45% to the left, then resize by 50%. place behind all items covering her legs but above her legs. Now duplicate, flip horizontally and place on the right side.
See Tag for example.
Now her legs should be covered where they cut off.
Take element 49 and place it behind the piano layer on the left, but dont cover any of your tube's face. Duplicate, flip Horizontally and place on the right, this one wont show as much, just make sure to not cover your tube's face in the frame.
Now take element 34 and resize by 175% and place on bottom layer to the right peeking out from behind your tube.
Take element 22 place on last layer of image, place in top left, duplicate, place in top right, merge down, duplicate again and place on bottom.
Place element 34 just above castle layer and place so it looks like its hanging from the tower.
Take element 33 and place it just above your last layers, flip it horizontally and arrange to your liking, see tag of example.
Now take element 5 and resize by 50% and place above frame layer, erase the star that is covering the tube at the top right.
Last take element 38 resize by 50% and place just above glitter layer and place at the top right.
Almost done....
Merge visible , Re-size to your liking (I like 600x600) then add the artist and your copyrights :) and choose your desired font,
for this I used, Sacramento , I used the purple from Mellisse's clothes. I added a light white glow. Under layer properties, size 10 glow 80%
Merge visible , Re-size to your liking (I like 600x600) then add the artist and your copyrights :) and choose your desired font,
for this I used, Sacramento , I used the purple from Mellisse's clothes. I added a light white glow. Under layer properties, size 10 glow 80%
Adjust size as desired.
No comments:
Post a Comment