
This tutorial is completely my own and any similarity is just pure coincidence...
Supplies Needed:
I use PSP X5
Tube of Choice, Im using in this one, the sexy Cindy Babe from Arthur Crowe, which you can purchase HERE
Scrap Kit: Precious Princess By Black Widow Creations which you can purchase HERE
Font of Choice I used Ithornet by Dirt2 found HERE for free
Supplies Needed:
I use PSP X5
Tube of Choice, Im using in this one, the sexy Cindy Babe from Arthur Crowe, which you can purchase HERE
Scrap Kit: Precious Princess By Black Widow Creations which you can purchase HERE
Font of Choice I used Ithornet by Dirt2 found HERE for free
Ok Lets get Started...
Open Up a new image, 900 x 900 (this tends to work better when using more elements)
It will look big but you will resize later...
Now choose
BWC_PreciousPrincess_EL30(frame)
and place it in your new image.
Resize by 125 %.
Next I added Miss Cindy, for Cindy, hide all layers except magic and Cindy Babe, then merge visible and place her in your image.
I then placed her infront of the frame where I thought she looked best, re-size and position as needed.I used a drop shadow on Cindy, this is
optional,the shadow will make her stand out more from the background. Attirbutes used are Opacity:45, Blur:9,Color:Black, Vertical:5
Horizonal:0.
Next pick a paper of your choice, I picked BWC_PreciousPrincess_PP4, Place paper in image, and position it the layer behind
the frame(el30) layer.
Now click on frame layer, and use the magic wand tool, and click inside the circle of the frame.Go up to selections, modify, expand, enter 10 in number of pixles,
go back up to selections and click invert. Now click on paper layer, and go up to edit and chose cut.Now go back up and select NONE.
This will remove all excess paper surrounding the frame.
Next pick out some more elements, I chose BWC_PreciousPrincess_EL7,BWC_PreciousPrincess_EL9,BWC_PreciousPrincess_EL14,
BWC_PreciousPrincess_EL19,BWC_PreciousPrincess_EL25,BWC_PreciousPrincess_EL26,BWC_PreciousPrincess_EL27.
Place Slippers (el25) opposite of Cindy,next place carriage opposite of Cindy but behind, the slippers, resize by 75%, and postion as desired.
Now place Cloud (el19) behind paper(pp4)layer and position as desired at the top of the image.
Next duplicate cloud, go to Image, then down to flip horizonal, and place as desired on the opposite side.Now
place sparkle stars (el9)into your image and place on the layer behind the clouds and position as desired at the top of the image,
with this repeat the duplicate and flip horizonal steps,and place as desired on the opposite side of where you placed the first set.
Take flowers (el26) and place in image behind the star layers, but this time place at the bottom as desired, and repeat duplicat and flip
horizonal steps, and place on opposite side at the bottom of image.
Next place castle (el7) in image and place behind frame but in front of the paper layer, resize by 75% and place within th frame
as desired. Now duplicate Cindy and resize by 125% and place her on the layer under the frame but above the castle.Next chose flip horizonal,
and position her as desired then click on the frame layer, chose your magic wand tool, click inside the circle,go up to selections,
chose modify, expand, 10,then back to selections, chose invert, then click on Cindy, go to edit and chose cut this will remove
the parts of Cindy from the outsides of the frame. Now go back up and select NONE.
Finally take element el27, and place on bottom layer, position in top corner, now dupilcate and position same side but in the
middle, repeat duplicate, and place in bottom corner. Dupicate once more, flip horizonal, move to opposite bottom corner, and repeat
steps on opposite side, after you have 3 on each side dupilcate again and place in the middle at top and bottom. This will give you'
the look of smoke behind your tag.
Almost done....
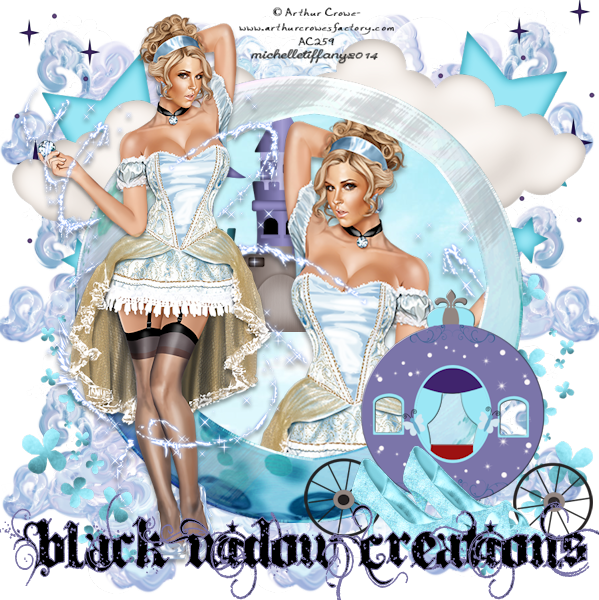
Merge visible , Re-size to your liking(I like 600x600)then add the artist and your copyrights :) and choose your desired font,
for this I used,Ithornet by Dirt2, I used a purple of the carriage to outline and filled it in with black.
Adjust size as desired.
And save as a PNG so that its transparent...
Next I added Miss Cindy, for Cindy, hide all layers except magic and Cindy Babe, then merge visible and place her in your image.
I then placed her infront of the frame where I thought she looked best, re-size and position as needed.I used a drop shadow on Cindy, this is
optional,the shadow will make her stand out more from the background. Attirbutes used are Opacity:45, Blur:9,Color:Black, Vertical:5
Horizonal:0.
Next pick a paper of your choice, I picked BWC_PreciousPrincess_PP4, Place paper in image, and position it the layer behind
the frame(el30) layer.
Now click on frame layer, and use the magic wand tool, and click inside the circle of the frame.Go up to selections, modify, expand, enter 10 in number of pixles,
go back up to selections and click invert. Now click on paper layer, and go up to edit and chose cut.Now go back up and select NONE.
This will remove all excess paper surrounding the frame.
Next pick out some more elements, I chose BWC_PreciousPrincess_EL7,BWC_PreciousPrincess_EL9,BWC_PreciousPrincess_EL14,
BWC_PreciousPrincess_EL19,BWC_PreciousPrincess_EL25,BWC_PreciousPrincess_EL26,BWC_PreciousPrincess_EL27.
Place Slippers (el25) opposite of Cindy,next place carriage opposite of Cindy but behind, the slippers, resize by 75%, and postion as desired.
Now place Cloud (el19) behind paper(pp4)layer and position as desired at the top of the image.
Next duplicate cloud, go to Image, then down to flip horizonal, and place as desired on the opposite side.Now
place sparkle stars (el9)into your image and place on the layer behind the clouds and position as desired at the top of the image,
with this repeat the duplicate and flip horizonal steps,and place as desired on the opposite side of where you placed the first set.
Take flowers (el26) and place in image behind the star layers, but this time place at the bottom as desired, and repeat duplicat and flip
horizonal steps, and place on opposite side at the bottom of image.
Next place castle (el7) in image and place behind frame but in front of the paper layer, resize by 75% and place within th frame
as desired. Now duplicate Cindy and resize by 125% and place her on the layer under the frame but above the castle.Next chose flip horizonal,
and position her as desired then click on the frame layer, chose your magic wand tool, click inside the circle,go up to selections,
chose modify, expand, 10,then back to selections, chose invert, then click on Cindy, go to edit and chose cut this will remove
the parts of Cindy from the outsides of the frame. Now go back up and select NONE.
Finally take element el27, and place on bottom layer, position in top corner, now dupilcate and position same side but in the
middle, repeat duplicate, and place in bottom corner. Dupicate once more, flip horizonal, move to opposite bottom corner, and repeat
steps on opposite side, after you have 3 on each side dupilcate again and place in the middle at top and bottom. This will give you'
the look of smoke behind your tag.
Almost done....
Merge visible , Re-size to your liking(I like 600x600)then add the artist and your copyrights :) and choose your desired font,
for this I used,Ithornet by Dirt2, I used a purple of the carriage to outline and filled it in with black.
Adjust size as desired.
And save as a PNG so that its transparent...
No comments:
Post a Comment